Monday, December 28, 2015

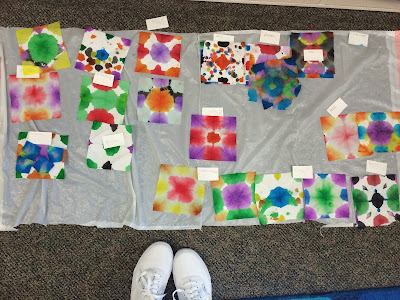
Watercolor Paper Towel Tie-Dye


Materials:
  • Watercolors
  • Scissors
  • Paint brush
  • Paper towels
  • Cups of water
  • Pencils
  • Notecards


Lesson Plan:
Have everyone gather on the button rug (1:00-1:05)
  1. Talk about their weeks and introduce the activity
  2. Explain the math game
  3. Every student gets one dice
  4. They roll the die and write down the number they land on, on a note card(Repeat 3 times)
  5. Add the 3 numbers together
  6. On the board, write a number that correlates with a color from their watercolor palette (1=Blue, 2=Yellow, 3=Red, 4=Purple, 5=Orange, 6=Green)
  7. Have each student write down the colors that correlate with the numbers that they rolled
  8. Pass out watercolor palettes, paint brushes, and paper towels (1/4 the regular sized paper towel... Cut them beforehand into approximately 6"x6" squares)
  9. Have the students come to the front of the room to watch you fold the paper towel up like you would to cut a snowflake
  10. Using someone's notecard with the numbers and correlated colors, show the class how to...
    1. fill the palette colors with water
    2. stir with paintbrush to saturate water with color
    3. dip the corners of the paper towel so it absorbs the colors that the numbers went with
    4. open up the paper towel to show the design 
  11. Let students go back to their table to create their own 
  12. teach the students how to lay out their wet paper towels to dry in a designated spot
  13. Clean up (Wipe down desks and put away supplies)


Dot Paintings

In Mrs. Goff’s class, the students are learning about nouns (Person, Place, or Thing). Today I will teach the students how to create a dot painting of their favorite “Place.”

Materials:

  • Tempura Paint
  • Q-tips
  • Paper Towels
  • Water cups
  • Pencils
  • White Paper
  • Paper Plates

Lesson Plan:

  1.  Gather the students on the button rug to review what nouns are. (9:50-9:55)
  2.  Introduce the objective -powerpoint (9:55-10:00)
  3. Show on overhead camera (10:00-10:05):
    1. How to draw the scene
    2.  How to dip, q-tips in paint, how to make spots, and how to wipe off q-tip
    3. Pass out paper
  4.  Give students time to create (10:05-10:40)
  5.  Clean up (10:40-10:45)


Tuesday, November 17, 2015

Patterned owls

The first class that I taught in Ms. Goff's classroom was about drawing patterns on owls. Since Ms. Goff had a substitute, we decided it would be easier if the children used simple materials instead of pulling out all the art supplies.

The materials we used were:
  • Colored Pencils
  • Crayons
  • Markers
  • White Yardstick
  • Black paper
  • Scissors 
The Objective was to color in and draw the wings and face on the owl, using patterns. I integrated this lesson into Ms. Goff's curriculum for the week by reading Owl Moon by Jane Yolen, at the beginning of my lesson. Since Ms. Goff was teaching the idea of a beginning, middle, and end of a story, we discussed which parts of the book fit into these categories.

The lesson plan went like this:
  1. Read picture book (9:50-10:00)
  2. Ask what the climax and end of the story was
  3. Show and tell directions-Describe and show different types of lines (10:00-10:10)
  4. Pass out owl materials
  5. Give them  time to create  (10:10-10:35)
  6. Pass out black paper and glue for background- have them draw stars, a moon, branch (10:35-10:40)
  7. Clean-up time
The lesson went very well. These students are very respectful and good at staying still and listening to instructions. Many of the students knew what patterns were and were able to easily follow my examples and come up with their own patterns.

My favorite part is how their little personalities show through their art. Some students fly through the projects and others spend the whole hour making meticulous marks on their paper. I love this class and had a blast with this first project!